BIOS 251 Week 6 Lab; Skeletal System
-
$15.00
| Institution | BIOS 251 Anatomy and Physiology I with Lab |
| Contributor | Stella |
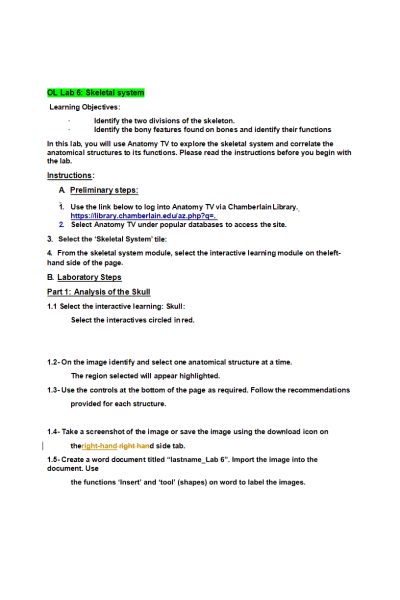
OL Lab 6: Skeletal system
Learning Objectives:
- Identify the two divisions of the skeleton.
- Identify the bony features found on bones and identify their functions
In this lab, you will use Anatomy TV to explore the skeletal system and correlate the anatomical structures to its functions. Please read the instructions before you begin with the lab.
Instructions:
- Preliminary steps:
- Use the link below to log into Anatomy TV via Chamberlain Library. https://library.chamberlain.edu/az.php?q=.
- Select Anatomy TV under popular databases to access the site.
- Select the ‘Skeletal System’ tile:
- From the skeletal system module, select the interactive learning module on the left- hand side of the page.
- Laboratory Steps
Part 1: Analysis of the Skull
- Select the interactive learning: Skull:
1.2- On the image identify and select one anatomical structure at a time.
1.3- Use the controls at the bottom of the page as required.
1.4- Take a screenshot of the image or save the image using the download icon on theright-hand right hand side tab.
1.5- Create a word document titled “lastname_Lab 6”. Import the image into the document. Use the functions ‘Insert’ and ‘tool’ (shapes) on word to label the images.
1.6- In complete sentences write the functional role of the selected anatomical structure under the image.
1.7- Save the file before you proceed to the next structure.
1.8- Follow these steps to analyze all the structures listed below.
Use the layer controls to remove/add layers ending on layer 1 and rotation controls to rotate the model to frame 10 for the following structures.
Part 2: Analysis of the vertebral column:
Select the interactive learning:
Select the interactives circled in red.
Vertebral column:
Repeat steps 1.2 to 1.7 to identify and select the structures listed below:
Use the layer controls to remove/add layers ending on layer 3 and rotation controls to rotate the model to frame 4 for the following structures.
Cervical Vertebra:
Repeat steps 1.2 to 1.7 to identify and select the following structures:
Thoracic Cage:
Repeat steps 1.3 to 1.6 to identify and select the following structures
Use the layer controls to remove/add layers ending on layer 2 and rotation controls to rotate the model to frame 2 for the following structures.
Part 3: Analysis of bones of the Upper Limb
Select the interactive learning: Bones of the Upper Limb Select the interactives circled in red.
Repeat steps 1.2 to 1.7 to identify and select the following structures: Bones of the pectoral girdle and arm:
Use the rotation controls to rotate the model to frame 16 for the following structures.
Bones of the forearm:
Use the layer controls to remove/add layers ending on layer 2 and rotation controls to rotate the model to frame 19 for the following structures
Part 4: Analysis of the bones of the Lower Limb
Select the interactive learning: Bones of the Lower Limb Select the interactives circled in red.
Repeat steps 1.2 to 1.7 to identify and select the following structures Bones of the pelvic girdle and thigh:
Use the rotation controls to rotate the model to frame 19 for the following structures.
Bones of the leg:
Use the layer controls to remove/add layers ending on layer 2 and rotation controls to rotate the model to frame 18 for the following structures
| Instituition / Term | |
| Term | Year 2022 |
| Institution | BIOS 251 Anatomy and Physiology I with Lab |
| Contributor | Stella |


